Windscreen
I never had any real problems with the original screen and I guess that if I was that concerned about wind and rain I should be in a car anyway but when I saw the Adventure I really liked the look of the larger screen so bought one.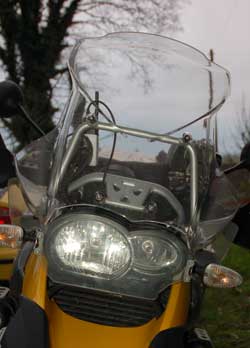
All the bits cost about £300 and fitting is very straightforward. Simply remove the original screen, position the new upper brace bar and screw on the new screen. I think the whole job took less than half an hour. The only problem was that the screws for adjusting the screen were a little short as they noe went through the new screen plus the new upper brace. This made it hard to undo them enough to adjust the screen position. My solution was to drop a couple of tiny nuts inside the dome nuts which secure the adjusting screws. This meant the nuts tightened up leaving a little more thread available for releasing the screws. Not much but enough.
I also fitted the little Adventure winglets. Again easy but it does involve drilling holes in the beak. The positioning of the holes is not obvious so I measured from an Adventure in the showroom.
Screen In Use
It's great. I think it looks good and comfortable riding at speed with visor up is possible. Initially I was having a small problem as the turned up top edge is much higher than the original, right in my line of sight, and distorted the view but after a couple of days I stopped noticing it. The extra brace means that it does not shake about like the original screen at tickover.
I am not sure if the winglets make any difference but it finishes the job off with the full Adventure look.
An expensive modification but I think it was worth it and much better than some of the aftermarket screens which look a bit cheap - and the bike is still 100% BMW.
|
